| Rendering/ Advanced Illumination Examples |
Advanced Illumination ExamplesContents:
Illumination MapsBig part of real-world illumination is created by surfaces that reflect illumination from actual light sources. White walls of a room spread the light from the lamp in the ceiling to shadowed places such as behind the furniture. The UVImage tool can evaluate and store this kind of indirect lighting to so called illumination maps. The following simple example shows how to use this feature. 1. Model a simple scene shown in the image below: a rectangular floor surface, one wall on the left and a table standing on the floor. Alternatively, you can load the sample scene 'tutorprojects/rendering/table'. The table consists of a cube and four cylinders. Place one point light source on top and to the right of the table. Open the property window of the light source and adjust its Intensity to level 1.0. You may also open the view property window and set Camera tab's Flashlight to black color (0,0,0). Then the only light source of the scene is the point light and shadows will be quite dramatic.
2. Next we generate the illumination maps. Go to the Materials tab of the toolbar and activate the UVImage tool. The default resolution is fine, but change the Type selector to 'Indirect lighting'. If you have time to wait a bit more accurate computation (and better quality), increase the Samples value from 1 to 3 - 5.
3. Select all objects for which you want to generate maps - in this case the wall, the floor and the table. Select also the point light source. This is important; surfaces have always two sides and the program must know for which side the illumination should be evaluated. The selected light source indicates it. Click Accept.
Wait until the progress indicator shows that the tool has finished. Now look at the select window: the object hierarchy has changed slightly because the tool has inserted new illumination maps to the hierarchy. The material library contains a set of new materials as well.
4. Hit the render button to ray trace an image of the scene. The space under the table, which was previously totally dark, now has some subtle illumination. The indirect illumination is usually weak compared to direct lighting. If you wish to enhance it afterwards, you can simply reduce the intensity of the point light source to one half and double the film sensitivity of the view camera from the view property window. You can naturally edit the diffuse illumination materials if you need to control illumination of a single object.
The tutorial example shows that illumination mapping is not part of the rendering process but a tool that changes the scene. This means that it is best suited for situations where it is necessary to make illumination of a static scene more realistic. The time consuming illumination maps are generated only once; after that, the camera can be animated to move in the scene. One can also add some animated objects whose contribution is not significant for indirect illumination. Note: before applying illumination maps to SDS objects, remember to initialize proper UV coordinates for them first.
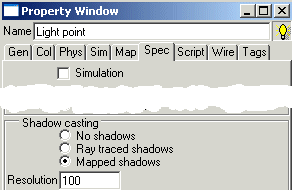
Mapped ShadowsShadow mapping is another texture mapping based illumination method. Mapped shadows usually have nice smooth edges which increase realism without the high rendering time penalty of ray traced smooth shadows. On the other hand, shadow mapping often suffers from a number of accuracy problems. It may take several rendering attempts to adjust them until the desired result is achieved. Let us continue experimenting with the table scene of the previous chapter. The indirect illumination maps may be included, but you can also reload the table scene 'tutorprojects/rendering/table'. 1. Select the point light source and open the property window. Go to the Spec tab. Then change the Shadow casting selector from 'Ray traced shadows' to 'Mapped shadows'. Then render the view window to see the result.
Although shadows now appear smooth-edged, some quality problems can be detected easily. The shadow on the side wall has some banding, and the top part of the legs become illuminated through the table top! The default shadow map resolution is most likely not enough. 2. Make sure that the light source is select and go back to the property window. The Spec tab shows that the default 'Shadow map resolution' is 100 pixels (actually 100*100 pixels, the resolution is always the same in both dimensions). Change the value to 400 pixels and render again. Now the quality is much better.
3. We finish this example by examining how to control smoothness of mapped shadows. Take a look at the property window of the light source again. The bottom part of the window contains a 'Size' field, which by default has the value of 0.1 meters. Double the value to 0.2 meters and render the view to see how the shadows change. The bigger the light source, the smoother the shadows. It is usually necessary to keep the size in a sensible value which matches the scene dimensions. A distant light source hundreds of meters away from the target should have a diameter of several meters to function properly. Room IlluminationThe next example demonstrates the same illumination techniques as the chapter above: indirect illumination maps and mapped shadows. This time the scene is a bit more complicated, a room interior shown below. The picture shows how the example scene 'tutorprojects/rendering/room' looks like when rendered with two point light sources (lamp, sun) and some flashlight.
First we generate the illumination maps: 1. Select the point light source inside the 'lamp' object. Then multiselect the 'room' level. We will generate the maps for only the largest surfaces of the scene, not for the furniture or other details. 2. Activate the UVImage tool from the Materials tooltab. Change Type to Indirect Lighting, set Samples value to 3-5 and hit OK. 3. Wait until the UVImage tool has finished the map computation. Then select the spot light source behind the room. We will change its shadow type to mapped shadows: open the property window, go to the Spec tab and activate the 'Mapped shadows' option. Increase the resolution to 400 pixels. 4. Since the spot light is far away from the room, increase its size to 1 meter. Large sizes will also make lighting appear smooth: the spotlight will simulate indirect illumination through a window on a bright day rather than direct sunlight. 5. When using mapped shadows with a spotlight, it is best to use a smooth falloff for the spot edge (sharp edge with otherwise smooth shadows looks peculiar). Therefore, increase the 'Angle2' value to 5 degrees greater than angle1. 6. Now select the light source in the lamp object and activate mapped shadows for it as well. Resolution can be again 200-400 pixels. The default size of 10 centimeters is quite realistic and suitable, so you do not have to change it. 7. Now comes an important step: There are some glass objects in the scene. Mapped shadows can take only the closest (transparent, translucent or non-transparent) surface into account. Therefore, select the sphere which surrounds the lamp light source and make it 'Shadow Invisible' using the 'Gen' tab options of the property window. Do the same for the glass window object as well. 8. Render a new image to see the changes in the illumination. Adjust shadow map resolutions and light source sizes if necessary.
Note: Shadow mapping can be applied to spot lights and point lights. Of these two, a spot light works much more efficiently and faster with shadow mapping, so try using that light source type whenever possible. Note: Analytic rectangle is the most accurate and memory efficient target for indirect illumination mapping. A room wall modeled using a cube requires 4-6 times more memory than a single rectangle (for a comparable quality).
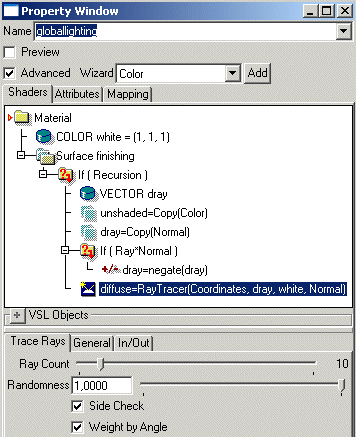
Post Processed IlluminationThe table scene tutorial above explained how indirect lighting can be defined using illumination maps. There is another, quite different approach to compute indirect illumination: use of post processing methods. Example project: tutorprojects/rendering/diffuselighting Tutorial level: advanced 1. Load first the test scene 'tutorprojects/rendering/table'. 2. Go to the Channels tab of the Select window and create two new color channels called 'diffuse' and 'unshaded'. These channels will carry diffuse illumination and unshaded diffuse color information from the ray tracer to the post processing system. Note: these channels may already exist after loading another illumination project or the default startup file. If they exist, you do not have to create duplicate ones. 3. Switch to the material tab, create a new VSL material 'globallighting'. Check the 'Advanced' option and define the following kind of VSL structure for it:
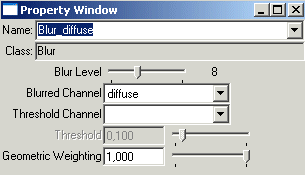
4. Go to the Geometric Objects tab, select the root level of the scene hierarchy, then switch back to the material library and drag&drop 'Globallighting' material to the view window. The material will shade all objects of the scene. 5. Go to the Post Image Effects tab of the select window. Create a new 'Blur' effect. On the property window, set blur level to a high value 5 - 10. The idea is to average the sampled indirect lighting over the image area. Thanks to this, random variations which would make the image dithered and grainy will disappear. Set 'Blurred Channel' to 'diffuse' (remember that it is the indirect lighting which was sampled by the Raytracer VSL object). Then set 'Geometric Weighting' to level 1. This option controls the averaging so that blurring works only over continuous surface areas - illumination from the floor area that is far behind the table should not affect the table.
6. Then create a new 'VSL Effect' using the popup menu of the select window. Check the 'Advanced' option. You see an 'Image processing' shader already available. Add one 'Operation' object to the VSL effect. The operation multiplies 'diffuse' with 'unshaded' and adds the result to the Color channel.
7. Select the 'Default Effects' post image or other suitable post processing configuration and add the two new post effects to the end of the Active Effects list - blur first, vsl effect after it.
8. Drag&drop the 'Default Effects' to the view window. Select a render settings object, for example 'Reasonable quality', and set 'Undersampling' values to 1. The new diffuse channel is not a trigger channel for undersampling, so it is best to sample every pixel accurately. Drag&drop the modified render settings to the view. Everything is now ready - just render the view to finish the tutorial.
Post processed illumination has some advantages compared to illumination mapping:
There are some disadvantages as well:
Note: the 'globalillumination' material above uses its own private recursion depth definition of 1. Indirect illumination is usually much weaker than direct illumination and therefore one recursion level is enough. Anyway, it is easy to apply a higher recursion value. The example project contains a second material version 'GI2' which does that. The second recursion step shading is otherwise similar to step one except that:
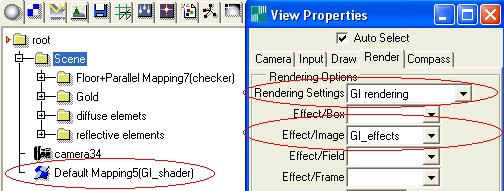
Easy Global IlluminationThe previous advanced tutorial demonstrated how to configure a global illumination system from scratch. In normal use, the standard components of the installation provide an easy work flow. Tutorial level: medium 1. The first step is to model a scene as usual. No attention to the GI solution is required at this point. For example, load again the test scene 'tutorprojects/rendering/table'. 2. When the scene is ready (loaded), select the root level of the hierarchy. Then switch to the material tab and drag the material 'GI_shader' onto the view window. This assigns the GI shader to all objects of the scene. If the 'GI_shader' material, for some reason, is missing, you can use 'New/From Template' popup menu to load it from the 'materials/illumination' folder. 3. Next switch to the render settings tab of the select window. Drag and drop the object 'GI rendering' into the view window. This render settings object includes an antialiasing channel setup which is tailored for global illumination. If 'GI rendering' is not included in the settings library, select 'Paste from file' from the popup menu and load it in from the 'rendersettings' disk folder. 4. The next step is to select a suitable post processing configuration. The easiest way is to switch to the Post Image Effects tab and drag & drop the 'GI_effects' post image into the view window. However, this would assign the effect as a render box specific effect. GI involves use of a wide blur filter which expands render boxes. Therefore, if your computer has a reasonable amount of RAM, we recommend that you open the view property window, clear the previous 'Effect/Box' (probably 'Default Effects') and set 'GI_effects' to the 'Effect/Image' field. As usual, if the 'GI_effects' effect is missing from the current post effect library, just use 'Paste from a file' and load in the 'posteffects/GI_effects.r3d' file.
Now the GI setup is ready. Let's continue by adjusting the GI settings to an appropriate level. Since a big part of the GI is computed at post processing time, we can use some time saving tricks here: 5. Select 'Render/Ray Trace+ Backup' from view's popup menu. The program first ray traces an image and finally post processes the global illumination into it. 6. To adjust the brightness of the global illumination into a suitable level, open the property window and select the VSL post effect 'GI_brightness_control' from the select window. The effect has two top level controls: a gamma correction curve which controls diffuse indirect illumination and a 'Specular' color value which scales the brightness of indirect illumination visible via reflections, transparency and specular lighting. Change the values as you like. Then, instead of rendering everything again, just apply the 'Post process' popup menu of the view window. Now the ray tracing part is skipped and the next image version appears much quicker. 7. The default settings include quite a low amount of indirect light sampling. Consequently, the rendered image may contain some noise which appears as an unwanted brightness variation. To reduce the noise, select the post effect called 'GI_blur'. On the property window, increase the 'Iterations' value by one or two units. Then apply 'Post process' on the view window to see the improved result. If this does not remove the noise, increase the 'Iterations' value further and post process again. A 10 pixel blur repeated 10 times will create 100 pixels wide blur. There are other predefined GI components available as well. 'GI_draft' post effect configuration works in a similar way, but it does not anti-aliase the result and in therefore about 4 times faster. Important notes:
Global Illumination Components
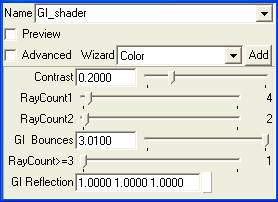
The material which takes care of Global Illumination has the following controls:
The post processing configuration for global illumination includes a component 'GI_brightness_control'. As the name suggests, you can control the amount of indirect illumination using it.
Specular Indirect IlluminationThe global illumination system of Realsoft 3D also includes specular illumination. With the specularity controls, you can simulate materials like leather, plastic and painted furniture.
Specularity is controlled using two custom channels:
GI_specularity=Constant(1, 0.8, 0.6) GI_specular_sharpness=Constant(20) ... |


 GI at contrast values 0.2 and 0.8

|
|
|